
Honeynet Project
http://www.honeynet.org
Last Modified: 27 January, 2003
Virtual Honeynets are a solution that allow you to run a complete Honeynet with
multiple operating systems on the same physical computer. First discussed
in the paper Know Your Enemy: Virtual Honeynets,
these solutions have the advantage of being easier to deploy and simpler
to manage. The Honeynet Project has also found VMware to make an excellent
development environment for Honeynet technologies. In this paper, we will take
you through step-by-step how to build and deploy such a solution using the commercial
software VMware. In this case, we will build
a GenII (2nd Generation) Virtual Honeynet with five different honeypots.
It is assumed you have read and understand the concepts discussed in both
KYE: Virtual Honeynets and KYE: Honeynets.
Also, if this is the first time you have ever worked with Honeynet technologies,
it is highly recommended you work in a lab environment. Last, as with all virtual
software, you need to be aware of the risk of attackers identifying, and potentially
breaking out of, the virtual environment. You have been warned.
Plan of Attack
Part I: VMware
VMware works by installing virtualization software on your computer. This
virtualization software then allows you to boot and run multiple operating systems
at the same time. The very first operating system you install, the base OS, is
called the HostOS. This is the operating system you install VMware on. Once
you have installed the HostOS and VMware, you can then install additional operating
systems that run within the virtual environment. All of these additional operating systems
are called the GuestOS's, as they are 'guests' on the Host operating system. To
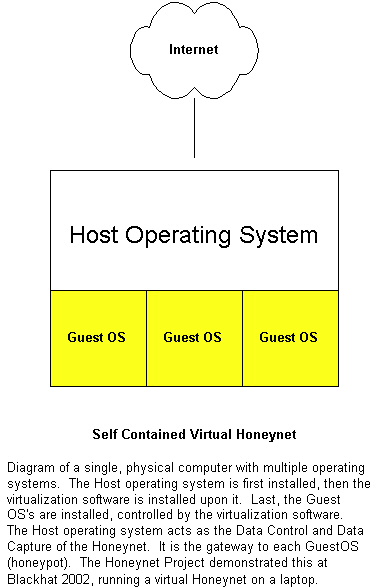
get a better understanding of how this works, refer to
Figure 1. Installing VMware on our Linux HostOS
is very easy, you simply install a single RPM package. The command looks similar to this.
host #rpm -vi VMware-gsx-2.0.1-2129.i386.rpm
There are additional software packages we can install, such as the remote administration
package. However, our laptop does not require this as all administration will be done
locally. For more information on these additional packages, refer to the VMware documentation.
Part II: Configuring VMware and Installing
your Honeypots
The format of this paper is similar to KYE: User-Mode Linux,
its broken down into five parts.
In the first part we will describe what VMware is, how it works, and how to
install it. In the second part, we describe how to configure VMware and install
your honeypots. In the third part we describe how to implement Data Control on your
VMware Honeynet using IPTables. In the fourth part we describe how to implement
Data Capture using Snort. Finally, in the fifth part, we describe how to test your setup.
VMware is virtualization software that allows you to run multiple operating systems
at the same time. Unlike User-Mode Linux, VMware allows you to run different operating
systems, as long as they can run on Intel X86 architecture. Developed
and sold by VMware Inc, there are actually three
different software products you can choose; Workstation, GSX, or ESX. Of the three, we
will be using GSX. GSX is more powerful then Workstation,
designed to run more then two operating systems at the same time and supports remote
administration. However, most of the information discussed here can also be applied to
Workstation. For the purpose of this paper, we are going to build our Virtual Honeynet
on a laptop, specifically an IBM Thinkpad T23, utilizing a PIII 1Ghz processor and
768 MB RAM. The base operating system is Red Hat 7.3.
Preparing packages for installation...
VMware-gsx-2.0.1-2129
Once installed, the next step is to configure the VMware software. Configuration is done
by executing the command 'vmware-config.pl'. During the configuration process, VMware will
most likely have to recompile several of its own kernel modules. This means you need
both a compiler and the source code for your kernel. On our laptop, we are
running kernel 2.4.18-19.7.x. We then confirm we have the source code.
host #uname -r
2.4.18-19.7.x
host #
host #rpm -qa | grep source
kernel-source-2.4.18-19.7.x
marge $ls -l /usr/src
total 8
lrwxrwxrwx    1 root     root           19 Dec 26 13:53 linux-2.4 -> linux-2.4.18-19.7.x
drwxr-xr-x   17 root     root         4096 Dec 26 13:53 linux-2.4.18-19.7.x
drwxr-xr-x    7 root     root         4096 Jul 12 11:52 redhat
Once you have the source code installed, you can begin the
installation. During the process, the only real option is Networking, which we want.
Remember, the goal is to have all the GuestOS's
route through the HostOS, our gateway. During the installation process, select Networking.
Later in the installation process, you will be asked if you want HostOnly networking.
Select this option also, and give the interface an IP address. This is the gateway IP address,
which we will be using 10.10.10.1. Linked below is the series of commands executed
during the configuration process.
Once you have completed the configuration process, VMware should now be running.
However, we have one problem. During the default configuration, VMware enabled three
interfaces; vmnet0, vmnet1, and vmnet8. Of those three networking interfaces, we
want only one interface, vmnet1. vmnet0 is used for bridging, so the GuestOS talks
directly to the network, bypassing the HostOS. vmnet8 is used for NAT Networks. Only
vmnet1 gives us the control of having the GuestOS's go through the HostOS.
Thus, we have to run vmware-config.pl again, then using the editor, remove the two
unwanted interfaces vmnet0 and vmnet8.
vmware-config.pl (being ran for the second time)
Once you have configured VMware, the next step is to install and configure the
individual honeypots. For our Honeynet, we are going to install and run
five different honeypots. The requirements for running so many operating systems
is not as intensive as you may think. Think about it, no one is going
to be using them except attackers, so there is little system activity. Also,
for the Unix based systems, there is no need for a GUI, you can administer the
systems at the Command Line Interface. Thus, no need for running X-Windows. As such,
memory requirements are minimal. Also, each operating system needs no more the
2 GB of hard drive space.
Installing the individual honeypots is simple. First, make sure the vmware
virtualization software is running with "ps aef | grep vmnet" and that you have
the interface vmnet1 "ifconfig -a". Once you have confirmed that is running,
create a new VMware window to install your honeypot. The command is
When you start the Window, you have the option of selecting an existing GuestOS to
boot up, or start the installation of a new GuestOS. For installing a new
GuestOS, select "Run the Configuration Wizard". Here you select which type
of GuestOS you are installing, the directory you will store the file system,
create a new virtual disk for the OS, size, enable the CDROM (be sure to
disable the floppy, unless its attached) and HostOnly networking. Once you have configured
the GuestOS, you simply insert the installation CDROM of the Guest operating
system, and Power On the system. From there, the
boot and installation of the GuestOS is as you normally
would with any operating system. You then proceed to repeat these steps for all
five GuestOS honeypots. Once installed, you have the option of installing
VMware tools on the honeypots. This helps increase the resolution of the GUI
interface. For the Unix systems, you do not need VMware tools, as you can administer from the
command line. For Window based honeypots, may want to install this on the
honeypots to increase resolution, however, it will be easier for attackers to
fingerprint the system as a VMware virtual system. For more information
on VMware configuration and GuestOS installation, refer to the
VMware documentation.
Before we go any further, you will want to backup your installed honeypots. VMware
stores each of your honeypots in a seperate file under its own directory. To backup
each honeypot, you only merely have to copy these files. This makes recovering or
rebuilding your honeypot extremly easy. With traditional Honeynets, after a honeypot
has been compromised and you are done analyzing the attack, you have to rebuild the
honeypot before putting it back online. This can be a time consuming process. However,
with VMware, rebuilding a honeypot is as simple as copying over your backups. You can
have your honeypots up and running within seconds. For example, VMware by default
stores the images of each honeypot under the directory /root/vmware. You can backup
all of the honeypots by copying this directory. Whenever you want to rebuild a
honeypot, you can merely copy over the honeypot directory containing its files.
Part III: Data Control
The first thing you have to decide is if
you want your gateway to run in layer three routing mode,
or layer two bridging mode. Layer two bridging (also known as GenII, or 2nd
generation) is the preferred method. When your gateway is acting as a bridge, there
is no routing or TTL decrement of packets, it acts as an invisible filtering device,
making it much more difficult for attackers to detect. However, for IPTables to
work in bridging mode, your kernel must be patched to support it. By default, most
kernels do not support IPTables in bridging mode. Red Hat kernel 2.4.18-3
is one of the few that does support this by default. If you want to patch your kernel,
you can find the patch at
http://bridge.sourceforge.net/download.html. For the purpose of this
paper, we will assume your kernel DOES support IPTables in bridging mode. If
your kernel does not support bridging mode, the refer to the paper
KYE: UML for more information on configuring the rc.firewall
script for layer three routing.
Lets cover how to configure the rc.firewall
script to implement GenII functionality. There are two critical areas to
configure, the networking issues and control issues. Actually, networking is
much simpler in bridging mode then in routing mode. In bridging mode there is
no routing, nor any Network Address Translation issues. We simply convert the
HostOS to a bridge, and the GuestOS's interact directly with other networks.
For connection issues, we have to configure how many outbound connections we
allow. The options we will have to configure are as follows.
First, you will need to set the public IP addresses of the Guest operating
systems. These are the IP addresses that hackers will attack, the
valid IP addresses of our honeypots. Since we have five honeypots,
we will need to list the five IP addresses. The firewall filters need
to know who they are.
PUBLIC_IP="10.10.10.201 10.10.10.202 10.10.10.203 10.10.10.204 10.10.10.205"
Second, you will need to identify the name of the internal interface
of the HostOS. By default, this is eth1. However, we are using
the virtual interface vmnet1, and have to modify this variable.
LAN_IFACE="vmnet1"
Third, since we are building a GenII Honeynet, you may want to
consider trying Snort-Inline capabilities to drop known outbound
attacks. It is beyond the scope of this paper to describe the details
of Snort-Inline, that will be discussed in the future paper Know Your
Enemy: GenII Honeynet. However, you may want to consider using the
Honeynet Snort-Inline Toolkit, which has static, precompiled binaries,
configuration files, rulebases, and documentation, which you will find .
in the Honeynet Tools section. If you
do want to test this capability, you will need to enable the QUEUE
option. NOTE: If you enable this option, you MUST be running Snort-Inline,
or ALL outbound packets will be dropped. If you are not sure at this
point, do NOT enable this feature.
#QUEUE="yes" # Use experimental QUEUE support
These are the minimum variables you will want to consider, there may be others
depending on the configuration of your system. There are additional
options you can update, such as remote management, limiting
what connections the firewall can initiate, and giving your honepyots
unrestricted DNS access. Also, by default, the script limits each honeypot to the
following outbound connections per hour; 9 TCP connections, 20 UDP connections,
50 ICMP connections, and 10 IP other. Details of the script are beyond the
scope of this paper. To better understand these variables, we recommend
you review the script in detail and try out the different options
in a lab environment. Once you have configured the
rc.firewall script, you implement
it by executing the script. Remember, you are going to be putting your
HostOS into bridging mode. For this, your HostOS must have the bridging
utilities. For Red Hat systems, this is known as "bridge-utils-0.9.3-4".
There are two gotchas when using bridging. First, you have to boot up
all of your GuestOS's before enabling bridging. When the GuestOS's boot,
they look for and use the vmnet1 interface. If this interface has already been set
to bridging mode, the GuestOS will not find the interface and cannot talk to
the network. So, start all of your honeypots BEFORE you run the rc.firewall
script. The second gotcha is time, it takes about 10-30 seconds for the
bridging to take effect. You have to give the bridge time to learn where
all the MAC's are before it can start bridging packets.
host #/.rc.firewall
To confirm the script was successful, there are several things to check.
First, ensure that bridging has been enabled. You can confirm this by checking your
/var/log/messages file, your kernel should log going into bridging mode. Second,
you should have a new interface called 'br0', which is your bridge. Third, use
the 'brctl' command to see what interfaces are bound to the bridge. Fourth, your external
and internal interfaces will no longer have an IP address, as they are now in bridging mode.
Last, review your IPTables rules to ensure you are filtering connections.
If successful, your Data Control is in place. There are also other
options for implementing Data Control, such as
bandwidth throttling.
Part IV: Data Capture
For IPTables, the logging has already been configured for us with the rc.firewall script.
It is configured to log all new inbound and outbound connection to /var/log/messages.
Any inbound connection is an indication of a probe, scan, or attack. Any outbound
connection indicates that a honeypot has been compromised. The value of IPTable logs
is one primarily for alerting. The
logs do not have enough information to tell us what the attacker is doing. For
Snort, we configure it to capture every packet and its full
payload that enters or leaves the Honeynet. Linked here is a
Snort config file that will capture and log attacker activity..
You will find a simple Snort startup script
that starts Snort and uses the recommended Snort config file. Be sure to update
the startup script to monitor the vmnet1 interface of the HostOS. You will most
likely want to run this script daily, running the script from cron.
host #./snort-start.sh
Since this is a GenII Honeynet, you may want to consider using more advance Data
Capture techniques, such as Sebek. This allows you to capture the attacker's
activities from kernel space. There are also a variety of other options for implementing
Data Capture which are beyond the scope of this paper. For additional options, check out
Honeynet Tools Section.
Part V: Testing Your VMware Honeynet
We will test outbound TCP connections, which by default are limited to 9
attempts per hour. To test this we will need two terminal windows open.
First we open a terminal on the HostOS and monitor the IPTable logs in
/var/log/messages. When we initiate outbound connections from the GuestOS
through our Host gateway, we should see the attempts logged there. This information
is critical for alerting purposes,
indicating the honeypot has been hacked, and the attacker (or automated tool)
is attempting outbound connections. Starting with the 10th outbound
attempt, the TCP connections should be blocked (the limit was met)
and logged. Below is the command you want to execute before attempting
any outbound connection.
host #tail -f /var/log/messages
Next, open a terminal on the honeypot system, our GuestOS. Initiate
a variety of outbound TCP connections to the external IP, in this case
10.10.10.100 (our UML systems). You will most likely have to repeat
the attempts several times.
Trying 10.10.10.100...
If you see the attempts logged, and blocked after the limit, you have
successfully implemented Data Control.
Next, we want to ensure that Data Capture is happening, specifically that
the Snort process is capturing all packets and their full payload that
are entering and leaving the Honeynet. A Snort process should be monitoring
the internal interface of the HostOS, specifically vmnet1. To test this,
attempt to ping the external system, in this case once again 10.10.10.100.
guest #ping -c 3 10.10.10.100
The Snort process should have captured the three ICMP Echo Request packets and
their full payload. It should have logged the activity to tcpdump binary log
format. To confirm, review the log file, an example is below. What is critical
is that you are not only capture every packet and its header, but you are
capturing the fully payload of every packet.
Thats it! You have just completed a very basic test of your Data Control and
Data Capture capabilities. There are far more advance tests you can attempt,
such as using a second, seperate computer to act as a system on the
Internet and interact with the honeypot. However that is beyond the scope of
this paper.
Note: As this paper was going through the final review phase, the Project
has begun using one of VMware's other features for advance forensic analysis.
Specifically, the Suspend feature of VMware. Suspend allows you to
literally suspend a GuestOS (or honeypot) image. It freezes all the running
processes and saves the memory image to a file. This means you can Suspend
your honeypot, turn off your computer, turn it on a week later, bring back
up the honeypot, un-suspend it, and you will have it exactly where it was
before. This has some incredible forensic applications. The Project has
begun saving suspended images of hacked computers, then sending those images
to others for analysis. This allows us to analyze a hacked honeypot while
its still in its running state. The concern here is when analyzing suspended
images, you have to ensure you are doing this on an isolated network, or
your hacked honeypot will attempt to connect to any systems it was communicating
with before being suspended.
Conclusion
host #ls -l /root/vmware
total 28
drwxr-xr-x    2 root     root         4096 Oct 10 01:10 linux-6.2
drwxr-xr-x    2 root     root         4096 Jan 14 19:00 linux-7.2
drwxr-xr-x    2 root     root         4096 Jan 14 22:14 linux-7.3
drwxr-xr-x    2 root     root         4096 Jan 25 15:15 openbsd
drwxr-xr-x    2 root     root         4096 Jan 25 15:15 solaris
drwxr-xr-x    2 root     root         4096 Dec 16 08:47 win2000Serv
drwxr-xr-x    2 root     root         4096 Jan 25 15:15 winXPPro
host #
host #cp -a /root/vmware /root/vmware-backup
Once you have setup VMware and the honeypots, the next step is Data Control. The purpose of
Data Control is to contain what the attacker can do inbound and outbound of the Honeynet.
Typically, we allow anything inbound to the Honeynet systems, but limit outbound connections.
For the purpose of this paper, we will use IPTables, an OpenSource firewall solution that
comes with Linux. IPTables is a highly flexible stateful firewall, including the ability
for connection limiting, network address translation, logging, and many other features.
We will configure IPTables to act as a filter on our HostOS,
counting outbound packets. Once a limit has been met for outbound connections,
all further attempts are blocked, preventing the compromised honeypot from harming
other systems. Configuring and implementing these capabilities can be extremely
complex. However, the Honeynet Project has develop an IPTables script called
rc.firewall that does
all the work for you. You merely have to modify the script variables as they apply
to your Honeynet, then run the script.
QUEUE="no" # Do not use experimental QUEUE support
Once we have completed Data Control, the next step is Data Capture. The purpose of
Data Capture is to capture all of the attacker's activity, without them knowing. There
are a variety of methods to implement this, however we will focus on two, IPTable logs
and Snort. IPTable logs are the logs generated by the firewall whenever there is an inbound
or outbound connection. Snort is an OpenSource IDS
solution which we will use to capture all network activity, and generate alerts for
known attacks.
The fifth, and final step, of building our VMware Honeynet is to test our configuration,
specifically Data Control and Data Capture. We want to ensure that our Honeynet
requirements are behaving as expected. Testing Data Control is relatively simple.
We want to ensure that any attempt by the honeypot to initiate an outbound connection
is both logged and controlled. By logged, all connection attempts should log an entry
to /var/log/messages, alerting us that an outbound connection has been initiated, and
the honeypot has most likely been compromised. Also, once the limit has been met, we
want to ensure that no more outbound connections are allowed. There is one trick
to testing our Honeynet, since we are bridging we need a second computer, the attacker.
The bridge will not forward any packets if it cannot match the destination IP to
a valid MAC address. If no packets are forwarded, we cannot test IPTables. For
those of you who don't have a second computer (or who are just hard core geeks),
you can run a second computer virtually by starting up a UML system. The UML
system will bind to the tap0 virtual interface, while all of our VMware honeypots will
bind to the vmnet1 virutal interface. This way your HostOS is bridging two
different virtual networks. Remember, you will have to modify your rc.firewall
script with tap0 being the external interface. To learn more about running UML, refer to the paper
KYE: UML. The UML can be the attacker, probing the VMware
honeypots. For the purpose of this paper, that is the testing concept we will
demonstrate. Our UML attacker's IP address will be 10.10.10.100. Yes, this really
does work :)
telnet: connect to address 10.10.10.100: Connection refused
The purpose of this paper was to describe step by step how to build a virtual
Honeynet using VMware virtualization software. The goal is to build an
entire Honeynet on a single computer. The advantage with VMware
is you can run many different types of operating systems at the same time. If
you would like to try building your own VMware honeynet, you can get an eval
copy of VMware at
http://www.vmware.com/download/#eval.